LogRhythm Remote collection of Flat File logs

Solution:  The System Monitor Agent can collect flat file logs from other hosts. To set this up, first open the Properties for the Log Source in question and go to the Flat File Settings tab. Here you can enter a UNC path to the location where the flat file logs are stored, for example, \\remotehost\c$\logs\*.log.

Once the path is set, you’ll need to make sure that the user account used by the LogRhythm System Monitor Agent Service has rights to access the remote host. Go into the Services screen in Windows and open the Properties for this service to make sure it’s using the appropriate user account.

If the remote host is not part of a domain, just create a LOCAL user on that host that has the exact same username and password as that specified in the LogRhythm System Monitor Agent Service Properties on the Agent host.

Tagged with: , ,
Posted in Log Rhythm

How do I change an IP address on a IPSO Nokia Firewall via clish

Below shows you the commands required to change the IP address of an interface within clish on a IPSO Nokia gateway,

1.add interface eth1c0 address IP [NEW IP]/[NETMASK]
2.delete interface eth1c0 address [OLD IP]
3.set interface eth1 speed 100M duplex full active on
4.set interface eth1c0 enable

Below gives you an example :

1.nokia-firewall[admin]# clish
2.NokiaIP390:102>add interface eth1c0 address IP 192.168.1.1/24
3.NokiaIP390:102>delete interface eth1c0 address 172.16.1.1
4.NokiaIP390:102>set interface eth1 speed 100M duplex full active on
5.NokiaIP390:102>set interface eth1c0 enable
Tagged with: , , , , , ,
Posted in CheckPoint

How to tell if your system is Disk-based, Hybrid, or Flash-only

Solution

There are two partitions /var and /opt are mounted differently based on the initial system configuration:


• for Diskbased systems both the /var and /opt partitions are mounted on the hard disk (wd0)


• for Hybrid systems (local Check Point logging on HDD) the /opt partition is mounted on v9fs and the /var partition is mounted on the optional hard disk (wd1) ( this assumes the customer has previously enabled the optional HDD for local logging — see article 1350934)


• for Flashonly systems the /var and /opt partitions are mounted on v9fs ( on-board memory file system)

Please use the “df -k” CLI command to verify your configuration as shown in the examples below. These apply to IP390, IP560 and IP12XX.


Disk-based installation verification information

————————————————————–

TOP[admin]# df -k

Filesystem 1K-blocks Used Avail Capacity Mounted on

/dev/wd0f 598029 85871 464316 16% /

/dev/wd0a 37556 32 34520 0% /config

/dev/wd0d 30978766 287029 28213436 1% /var

/dev/wd0e 5268700 268396 4578808 6% /opt

procfs 4 4 0 100% /proc


Hybrid Installation verification information

——————————————————–

IP560[admin]# dfk

Filesystem 1K-blocks Used Avail Capacity Mounted on

/dev/wd0f 266383 44080 200993 18% /

v9fs 767388 50548 716840 7% /image/IPSO-4.1-BUILD013-03.27.2006-223017-1515/rfs

/dev/wd0a 31775 161 29072 1% /config

/dev/wd0h 664831 205476 406169 34% /preserve

/dev/wd1d 37905549 23674 34849432 0% /var

procfs 4 4 0 100% /proc

mfs:92 7607 0 6998 0% /var/tmp2/upgrade

v9fs 837452 120612 716840 14% /opt

IP560[admin]#


Flash-Only installation verification information

————————————————————–

IP560[admin]# df -k

Filesystem 1K-blocks Used Avail Capacity Mounted on

/dev/wd0f 266383 44080 200993 18% /

v9fs 755824 50548 705276 7% /image/IPSO-4.1-BUILD013-03.27.2006-223017-1515/rfs

/dev/wd0a 31775 161 29072 1% /config

/dev/wd0h 664831 205478 406167 34% /preserve

procfs 4 4 0 100% /proc

v9fs 716840 11564 705276 2% /var

mfs:97 7607 0 6998 0% /var/tmp2/upgrade

v9fs 825888 120612 705276 15% /opt

IP560[admin]#

Tagged with: , , , , ,
Posted in CheckPoint

How to change the IPSO admin password when it is lost or unknown

Solution You must have local serial console access to the unit to perform this procedure.LEGACY IPSO PASSWORD RESET WALKTHROUGH

    1. Boot the system into single user mode. On the IP440, this is done by typing -s at the boot:prompt. On all other platforms, enter the bootmanager and type boot -s.
    2. After it boots, it will ask you “Enter pathname of shell or RETURN for sh:”, press Enter key.
    3. Type /etc/overpw in the # prompt. It will ask if you want continue, type “y”.
    4. IPSO 3.4 and above will ask you to set a password. Earlier versions will set a null password.
    5. Continue to boot to multiuser mode.
    6. Login as admin. If a password is required, you will be asked for one.
    7. Even if you set a password in step 4, use the dbpasswd command to set a new password:nokia[admin]# dbpasswd admin newpassword “”

      (Note that the “” is necessary to specify (NULL) as the old password.)

      Then, save this new password to the configuration file so that you can log into Network Voyager:

      nokia[admin]# dbset :save

IPSO 6.2 PASSWORD RESET WALKTHROUGH

• Enter boot manager by pressing any key when you see the prompt below:

Loading boot manager..Boot manager loaded.
Entering autoboot mode.
Type any character to enter command mode.
BOOTMGR[1]>

• Type the command: boot -s  in order to boot into single user mode

• It will ask you to Enter full pathname of shell or RETURN for /bin/sh:  Just press ENTER

• At the # prompt type the command:  /etc/overpw

• Follow the wizard:

This program is used to set a temporary admin password when you have
lost the configured password. You must have booted the machine into
single user mode to run it. The configured password will be changed.
Please change the temporary password as soon as you log on to your
system through voyager.

Please enter password for user admin: <enter password here>
Please re-enter password for confirmation: <re-enter the password here>
Continue? [n] y

• You should see the following output:

admin password changed. You may enter ^D to continue booting.
THIS IS A TEMPORARY PASSWORD CHANGE.
PLEASE USE VOYAGER TO CREATE A PERMENANT PASSWORD FOR THE USER ADMIN.

• Press CTRL+D to continue to IPSO
• Login using your new password
• Launch Clish by typing the command: clish
• While in clish type the command: save config
• Reboot and test your password again

Tagged with: , , , , , , , , ,
Posted in CheckPoint

Log Rhythm Terminology

Event Manager – The LogRhythm Event Manager server is a Windows Server system. There is one Event Manager per deployment. The Event Manager provides centralized event management, incident management, analysis, reporting, and configuration across a LogRhythm deployment. It houses the Knowledge base and consists of the following databases: Event Manager (EMDB), Alarms, Events, and LogMart. It consists of the following services: LogRhythm Alarming and Response Manager (ARM) and the LogRhythm Job Manager

Log Manager (LM) – The LogRhythm Log Manager is a Windows Server system. There can be one or more Log Managers per deployment. The Log Manager provides Central log data storage, processing, archiving, distribution, and event processing and forwarding. It consists of the following databases: Log Manager (LMDB) and Restore Archive (RADB). It consists of the following service: Mediator Server. The Mediator Server contains the Message Processing Engine (MPE) and the AI Engine Data Provider. In medium to large installations, Log Managers should be dedicated systems. However, in low volume deployments, a Log Manager can coexist on the same system as the Event Manager (known as an XM).

Advanced Intelligence (AI) Engine – The AI Engine is a Windows Server system. It is LogRhythm’s advanced analysis platform that performs correlation, pattern recognition, and behavioral analysis. It receives logs from the Log Manager Mediator’s AI Engine Data Provider and sends events to the Event Manager. There are no databases for the AI Engine. It communicates with the Log Manager. It consists of the following services: AI Engine Communication Manager and AI Engine Server.

System Monitor Agent – The System Monitor Agent, also just called Agent, is a software component that provides local and remote log data collection across various operating systems including Windows, Linux, AIX, HPUX, and Solaris. See the Compatibility Guide for a list of all supported operating systems and *Nix distributions. It serves as a central log data collector, collecting logs from many devices, servers, databases, and applications, performing host activity monitoring and forwarding logs, via authenticated TCP connections, to the Log Manager. It consists of the following Windows Service: System Monitor Service. It consists of the following *Nix Daemons: AIX, HPUX, Linux 2.4, Linux 2.6, Solaris 8, 9, 10 SPARC, Solaris 10×86.

SQL Trace File Converter (TFC) – The LogRhythm SQL TFC is a software component that converts SQL Server trace files into UTF8 encoded text files that LogRhythm Windows and UNIX System Monitor Agents can read and forward to the Mediator for processing.

Console – The LogRhythm Console is a Graphical User Interface (GUI) that provides deployment administration and user interaction with LogRhythm. It is the single pane of glass for viewing logs, events, alerts, and reports. The console can be installed on various Windows operating systems.


Tagged with: , , , , , , , ,
Posted in Log Rhythm

Upgrade BlueCoat Proxy SGOS software

Problem Description

How to upgrade SGOS.

Resolution

To Upgrade SGOS to the latest recommeded version folllow the guide below. **!!ALWAYS READ SOFTWARE RELEASE NOTES OF THE VERSION YOU ARE GOING TO, CANNOT STRESS THIS ENOUGH!!**

Check for latest recommeded version here.

Check the release notes and determine the upgrade path.

Get the image from https://bto.bluecoat.com/download, choose your version and agree to the terms and conditions.

If you need to upgrade more that 1 proxy download the file to your desktop, else you can use the direct download link to download directly to you ProxySG, might also be useful if the ProxySG is located remotely.

Installing the image to the proxy and loading the new version.

Login to the GUI.

Go to Maintenance > Upgrade.

Use the Direct link or upload the image you downloaded earlier. (don’t use Firefox for this as is will fail.)

If you are migrating from SGOS 5 to 6 have a look at this document, to make sure policy is maintained. Complete upgrade guides can be found under the documentation section of BTO here.

After the upload finishes, the new image is set as default, and you can now use the “Restart” button to reboot into the new version.

Tagged with:
Posted in BlueCoat

Upgrade the BlueCoat ProxyAV firmware / software

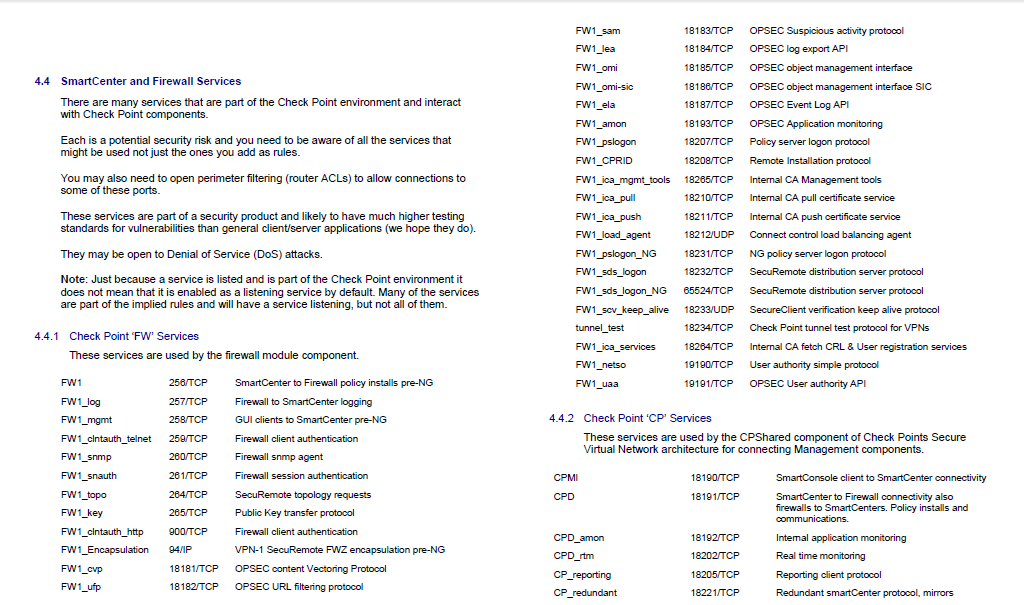
There are 3 ways to upgrade the firmware/software on BlueCoat proxy AV device.

Problem Description

How do I update or upgrade the ProxyAV firmware?
How do I upgrade the ProxyAV firmware?
Resolution

This document will walk you through the process of updating or upgrading the ProxyAV firmware on your ProxyAV appliance. It will go from the easiest solution solution to one in which you will spend more effort to update.

SOLUTION #1: DOWNLOAD DIRECT FROM BLUE COAT (AUTOMATIC UPDATE)

If your ProxyAV has access to the Internet, this is the easiest method in which to update your ProxyAV appliance. Please do the following:

1.) Go to the ProxyAV Management Console (https://:8082 ) and login.
2.) In the menu on the left hand side, click on Firmware Update. In the Update Method, you have the following four options:

Disable Firmware updates
Check, but don’t retrieve update (default)
Check and retrieve update
Closed Network/Direct update

If you want to automatically update, select the second (Check, but don’t retrieve) or third (Check and retrieve update) option and click on the Save Changes button. If an update is available, the Update Now button will be active.

3.) Click on the Update Now button. Depending on your selection above, the update will be downloaded and then installed. It may take five minutes or so (maybe longer, depending on the option selected and the speed of your Internet connection). Please make sure that the upgrade is done during off-hours so as to not impact your users.
4.) After several minutes, login to the Management Console and click on Firmware Update. At the top of the screen you will be told what version of ProxyAV you are running.
5.) Click on Antivirus. Make sure your antivirus software is installed and running. If not, then click on Update.
6.) (Optional) If you are downloading your AV software, click on the Home button and look at the Current Downloads at the bottom of the page. You can see where the ProxyAV is at with regards to AV download.

SOLUTION #2: DOWNLOAD DIRECT FROM BLUE COAT (DIRECT UPDATE)

This is similar to Solution #1 above but it requires a few more steps. The ProxyAV must have access to the Internet. You must also have BlueTouch Online (BTO) credentials. If you are uncertain if you have BTO credentials, please search the knowledge base for “bto credentials”. Please do the following:

1.) Go to https://bto.bluecoat.com/download/product/4 . Login using your BTO credentials. If you do not know if you have BTO credentials, search the knowledge base for “bto login”. If you don’t have BTO credentials, then use solution #1 above.
2.) Find the release of ProxyAV you wish to run. Click on the PLEASE READ link and view the release notes.
3.) After reviewing the release notes, click on the AllPlatforms link. Read the software download rules and then click on the “I agree and wish to download this software” button.
4.) You will be provided with a direct download link. The link will look something like this: https://bto.bluecoat.com/download/direct/ . Copy that entire link.
5.) Go to the ProxyAV Management Console (https://:8082 ) and login.
6.) In the menu on the left hand side, click on Firmware Update. In the Update Method, select Closed Network/Direct update. Paste the URL from step 4 above into the Update Location box and click on the Save Changes button.
7.) Go back to the Firmware Update and now click on the Update Now button. The update will be downloaded and then installed. It may take five minutes or so (maybe longer, depending on the option selected and the speed of your Internet connection). Please make sure that the upgrade is done during off-hours so as to not impact your users.
8.) After several minutes, login to the Management Console and click on Firmware Update. At the top of the screen you will be told what version of ProxyAV you are running.
9.) Click on Antivirus. Make sure your antivirus software is installed and running. If not, then click on Update.
10.) (Optional) If you are downloading your AV software, click on the Home button and look at the Current Downloads at the bottom of the page. You can see where the ProxyAV is at with regards to AV download.

SOLUTION #3: CLOSED NETWORK UPGRADE

This option can be used if the ProxyAV does not have a connection to the Internet. Please note that you will need a workstation that can access the Internet and an internal web server that the ProxyAV can reach. You will also need BTO credentials. If you are unsure if you have BTO login credentials, please search the knowledge base for “bto login”.

1.) Go to https://bto.bluecoat.com/download/product/4 . Login using your BTO credentials. If you do not know if you have BTO credentials, search the knowledge base for “bto login”. If you don’t have BTO credentials and your ProxyAV does not have a direct connection to the Internet, then you cannot proceed.
2.) Find the release of ProxyAV you wish to run. Click on the PLEASE READ link and view the release notes.
3.) After reviewing the release notes, click on the AllPlatforms link. Read the software download rules and then click on the “I agree and wish to download this software” button.
4.) Click on the DOWNLOAD NOW button. You will download a file similar to “ProxyAV_VersionNumber_BuildNumber_AllPlatforms.direct”.
5.) Copy the downloaded file to a web server that you have access to. Make note of the URL (Example: http://192.168.15.121/proxyav/ProxyAV_3.3.1.1_54516_AllPlatforms.direct ). NOTE: You may need to configure your web server so that when it serves up the file, it provides a Content-type of something similar to application/octet-stream. If you are unsure how to do this, you can try it without making a change and see if you are successful in your firmware update.
6.) Go to the ProxyAV Management Console (https://:8082 ) and login.
7.) In the menu on the left hand side, click on Firmware Update. In the Update Method, select Closed Network/Direct update. Paste the URL from step 5 above into the Update Location box and click on the Save Changes button.
8.) Go back to the Firmware Update and now click on the Update Now button. The update will be downloaded and then installed. It may take five minutes or so (maybe longer, depending on the option selected and the speed of your network connection). Please make sure that the upgrade is done during off-hours so as to not impact your users.
9.) After several minutes, login to the Management Console and click on Firmware Update. At the top of the screen you will be told what version of ProxyAV you are running.

Tagged with: , , , , ,
Posted in BlueCoat

Modifying Policy Installation timeouts

Modifying Policy Installation timeouts For large Policy base install, it may be necessary to increase the following timeout:

  • Between SmartConsole and SSecurity Management server.
  • Between the Security Management server and the Security gateway.


Increasing timeout between SmartConsole and Security Management server

Perform the following on the Security Management server machine:

  1. Run regedit and locate the following path:HKEY_CURRENT_USER\Software\CheckPoint\Management Clients\<version>\CheckPoint SmartDashboard
  2. Create a value named “ServerTimeout” of type DWORD, and assign its data an appropriate value in milliseconds.
  3. Run cpstop;cpstart
  4. Install the policy

Increasing the timeout between Security Management server and the Security Gateway

  1.  Stop the Security Management server. Run cpstop
  2.  Edit the $FWDIR/conf/objects_5_0.C file or use GuiDBedit.
  3.  Search for the property ‘install_policy_timeout‘ and change its value to 1000 as shown below:
    :install_policy_timeout (1000)Note: The number is in seconds and the default timeout is 600 seconds, increase as necessary.Path in GuiDGEdit:
    Global Properties -> firewall_properties -> install_policy_timeout 

4.  Save the file and start the Security Management server (‘cpstart‘)

5.  Install the policy.

Tagged with: , , ,
Posted in CheckPoint

CheckPoint SCS & FW Services

Great reference to the CheckPoint SCS & FW services;

checkpointFWservice and CPservicescheckpointFWservice and CPservices part2


Tagged with: , , , ,
Posted in CheckPoint

Basic Network connectivity with LINUX + useful commands

Verify interfaces and their status

ifconfig   [Physical LAN]

iwconfig  [Wireless LAN]

Previous versions (before BT5R3) had networking disabled by default.  

To start it use:

/etc/init.d/networking start

or could use the command “start networking”

Enable SSH

sshd-generate

/etc/init.d/ssh start

could also have said “start ssh”

Assign static IP, and bring interface up

ifconfig eth0 192.168.1.222/24 up

ifconfig eth0

Configure default gw

route add default gw 192.168.1.1

ping 8.8.8.8

See the contents of the resolv.conf file

more /etc/resolv.conf

Add dns info to resolv file

echo nameserver 8.8.8.8 > /etc/resolv.conf

Ensure network config is permanent

vi /etc/network/interfaces

! use ins key to change edit mode

! edit the interface that is being used on your BT

iface eth0 inet static

address 192.168.1.222

netmask 255.255.255.0

network 192.168.1.0

broadcast 192.168.1.255

gateway 192.168.1.1

! use esc : w q  (to save and exit)

Another way of making the IP persistent accross reboots

update-rc.d networking defaults

enable ssh at boot time

update-rc.d -f ssh defaults

Enable/Disable/Restart  networking service, if ever you need to

/etc/init.d/networking start

/etc/init.d/networking restart

/etc/init.d/networking stop

Options for up and down

ifconfig eth0 up

ifconfig eth0 down

to become dhcp client

dhclient eth0

useful commands

folder size; run from root / or any other directory you’re in to see largest folders

du -smh * | sort +0nr

also to see;

disk usage partitions and amount of spaced, used, available and total size use

dh -h (this is human readable i.e show it like 500Mb etc)

dh -k also


Package management commands in debian;


sudo apt-get update (updates to latest apt-get)
sudo apt-get install rpm (downloads and installs rpm)
sudo apt-get install alien (downloads and installs alien so you can convert .rpm files for red hat to .dpkg for debian)
sudo alien nmap-5.51-1.i386.rpm (this runs alien on the .rpm file convert it to .deb , debian format)
dpkg -i nmap-5.51-1.i386.deb (dpkg – debian package manager rpm = red hat package manager)

Tagged with: , , , , , , , , ,
Posted in Useful Tools